Once you have invited team members, the next step in the onboarding process is to create teams, dedicated IP and gateways for your new team members.
Teams
The Teams section is where the admin can create various teams, assign and remove members, and manage their dedicated IPs and gateways. To access this section, simply click on the Teams tab.
Create your team
- To create a team, click the Team Management > Members tab.
- Click Add New Team.
- Enter the name of the team and click Create Team.
Add members to your team
- To add members to your team, click the Team Management > Members tab.
- Click the three-dot icon against the team you want to add a member to.
- Click Manage Members.
- Click Assign Team Member.
- Find the member by email and click Assign.
Remove members from your team
- To remove members from your team, click the Team Management > Members tab.
- Click the three-dot icon against the team you want to remove a member from.
- Click Manage Members.
- Click the three-dot icon against the member you want to remove from your team.
- Click Remove Member.
Delete your team
- To delete your team, click the Team Management > Members tab.
- Click the three-dot icon against the team you wish to delete.
- Click Delete Team.
Dedicated IP
PureDome's dedicated IP service will provide you with a static IP address that only you can use. This IP will be different from your actual local IP, so you'll still be protected online. All your data traffic will be sent through the dedicated IP without losing any control of your privacy. To access this section, simply click on the Gateways tab.
When provisioning dedicated IPs, you will see two options available for configuration and deployment:
- Premium Dedicated IP
- Essential Dedicated IP
Here's a table comparing the Premium Dedicated IP and Essential Dedicated IP services offered by PureDome:
Feature |
Premium Dedicated IP |
Essential Dedicated IP |
| City wise offering | Yes | No |
| Supported locations | 30 | 07 |
| Support on browser ext. | Yes | No |
| Supported apps | Windows, macOS, Android, iOS and Linux | Windows, macOS, Android, iOS and Linux |
| Supported protocols | IKE and OpenVPN | IKE and OpenVPN |
Please review the table comparison above to determine which option best meets your requirements.
Create a dedicated IP and assign it to a team member
- To create a dedicated IP, click the Gateways > Dedicated IP tab.
- Click Assign Dedicated IP.
- Choose the type of dedicated IP (either essential or premium) and select the location for the dedicated IP assignment. From the member dropdown menu, choose the member to whom you wish to assign the dedicated IP and click Assign Dedicated IP.
- If your dedicated IP type is premium, then your dedicated IP will enter deployment mode. This process typically takes 5-10 minutes. You will receive confirmation that the dedicated IP has finished deploying when its status shows as active, and you can view the hostname and IP address associated with your dedicated IP. If your IP type is essential, it will deploy immediately.
Assign dedicated IP to a team member
- To assign a dedicated IP to a team member, click the Gateways > Dedicated IP tab.
- Click the three-dot icon against the dedicated IP you want to assign a team member to.
- Click Assign Dedicated IP.
- Find a team member you wish to assign a dedicated IP to and click Assign Dedicated IP.
Remove dedicated IP
- To remove a dedicated IP, click the Gateways > Dedicated IP tab.
- Click the three-dot icon against the dedicated IP you wish to remove.
- Click Remove Dedicated IP.
- Click Remove IP.
Convert dedicated IP to a gateway
- To convert dedicated IP to a gateway, click the Gateways > Dedicated IP tab.
- Click on the Convert to Gateway button.
- A pop-up will appear, prompting you to choose the capacity of your gateway.
- The options for gateway capacities include 50, 100, and 150 concurrent sessions.
- Choose the gateway capacity you prefer and then click on Apply Changes.
- A confirmation note will appear, indicating that the change is being processed and advising that converting the dedicated IP to a gateway may take between 12 to 15 minutes. Please note that during this upgrade, the dedicated IP will experience temporary downtime, and ongoing sessions may be interrupted. Click Deploy Now to proceed.
- You'll be prompted to create a name for your gateway. Enter a name for your gateway and then click on Create Gateway.
- Upon completion, the gateway will enter the upgrading mode, typically requiring 10 to 15 minutes. Once the upgrade concludes, the IP will no longer be visible in the dedicated IP tab; instead, it will be accessible in the gateway tab, ready to be assigned to a team.
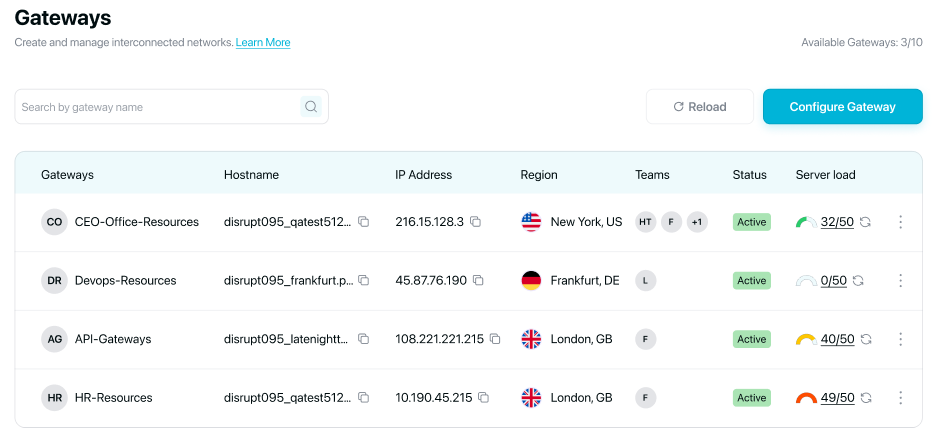
Gateways
A dedicated gateway server is a server that you've purchased for your team so they can receive a customised host-name that can be used by multiple devices at a single time. By using a dedicated gateway server, all devices will receive the same public IP address.
This is especially useful for businesses because it provides an extra layer of security. If you have a dedicated gateway server, you can be sure that only authorised devices can access your network. You will need to buy a licence for each of your dedicated servers. To access this section, simply click on the Gateways tab.
Create a gateway
- To create a dedicated gateway, click the Gateways tab.
- Click Configure Gateway.
- Enter the name of the gateway, choose a server location and click Create gateway.
- Once done, the server will be in deploying mode. This process usually takes 5-10 minutes. You will know the server is done deploying when the status says it is active and you see a hostname and IP address next to your dedicated gateway server.
Assign gateway to a team
- To add a dedicated gateway to a team, click the Team Management > Members tab.
- Click the three-dot icon against the team you want to add a dedicated gateway to.
- Click Manage Gateways.
- Mark check ✅ the dedicated gateway you wish to assign to a team.
- Click Save.
Un-assign gateway from a team
- To un-assign a dedicated gateway from a team, click the Team Management > Members tab.
- Select the team for which you wish to remove the dedicated gateway by clicking on the three-dot icon.
- Click Manage Gateways.
- Uncheck ✅ the dedicated gateway you wish to remove.
- Click Save.
Remove gateway
- To remove a gateway, click the Gateways tab.
- Click the three-dot icon against the gateway you wish to remove.
- Click Remove Gateway.
Increase gateway capacity
- To increase the capacity of the gateway, click the Gateways tab.
- Click the three-dot icon next to the gateway for which you intend to increase the capacity.
- Click Set Gateway Capacity.
- If you've already obtained a gateway licence with increased capacity, a pop-up box will appear, offering you the option to upgrade to it. Alternatively, if you don't have a higher-capacity licence, you'll be provided with the choice to upgrade using a new gateway licence.
- Choose the gateway capacity you prefer and then click on Apply Changes.
- A confirmation note will appear, indicating that the change is being processed and advising that adjusting the gateway's capacity may take between 12 to 15 minutes. Please note that during this upgrade, the gateway will experience temporary downtime, and ongoing sessions may be interrupted. Click Deploy Now to proceed.
Gateway load
- To view the load and the number of concurrent users connected to the gateway, click the Gateways tab..
- In the gateway section, there is a column labeled Server load. Within this column, you can easily keep track of the number of concurrent users currently connected to the gateway in real-time.