
To access PureDome applications, users have the option to verify their identity using Google Workspace Single Sign-On (SSO).
How to enable Google SSO?
Below are the steps to configure Google Workspace SSO integration:
Step 1 - Setting up SSO Application on Google Workspace
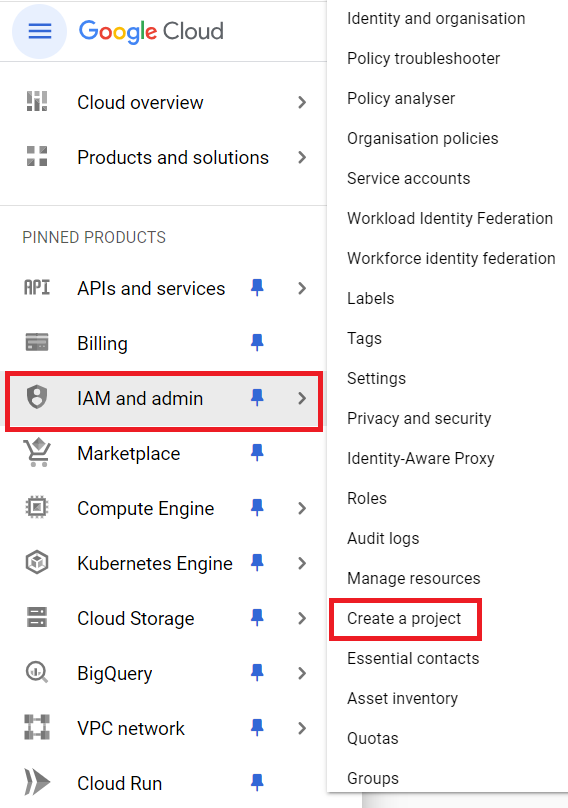
- Log in to the Google Admin console, and go to IAM and admin > Create a project.
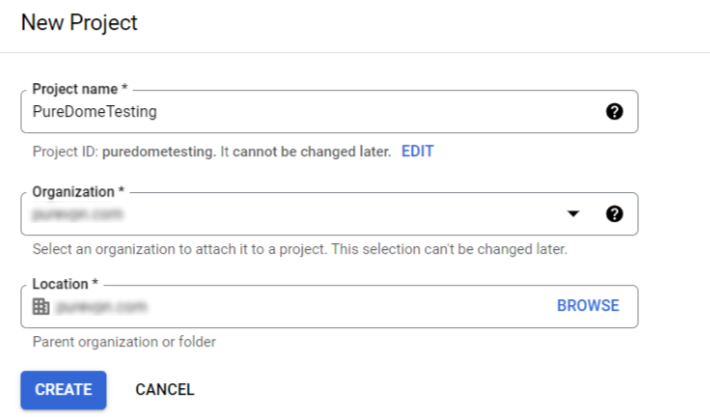
- Enter Project name, assign this project to an organisation and click CREATE.
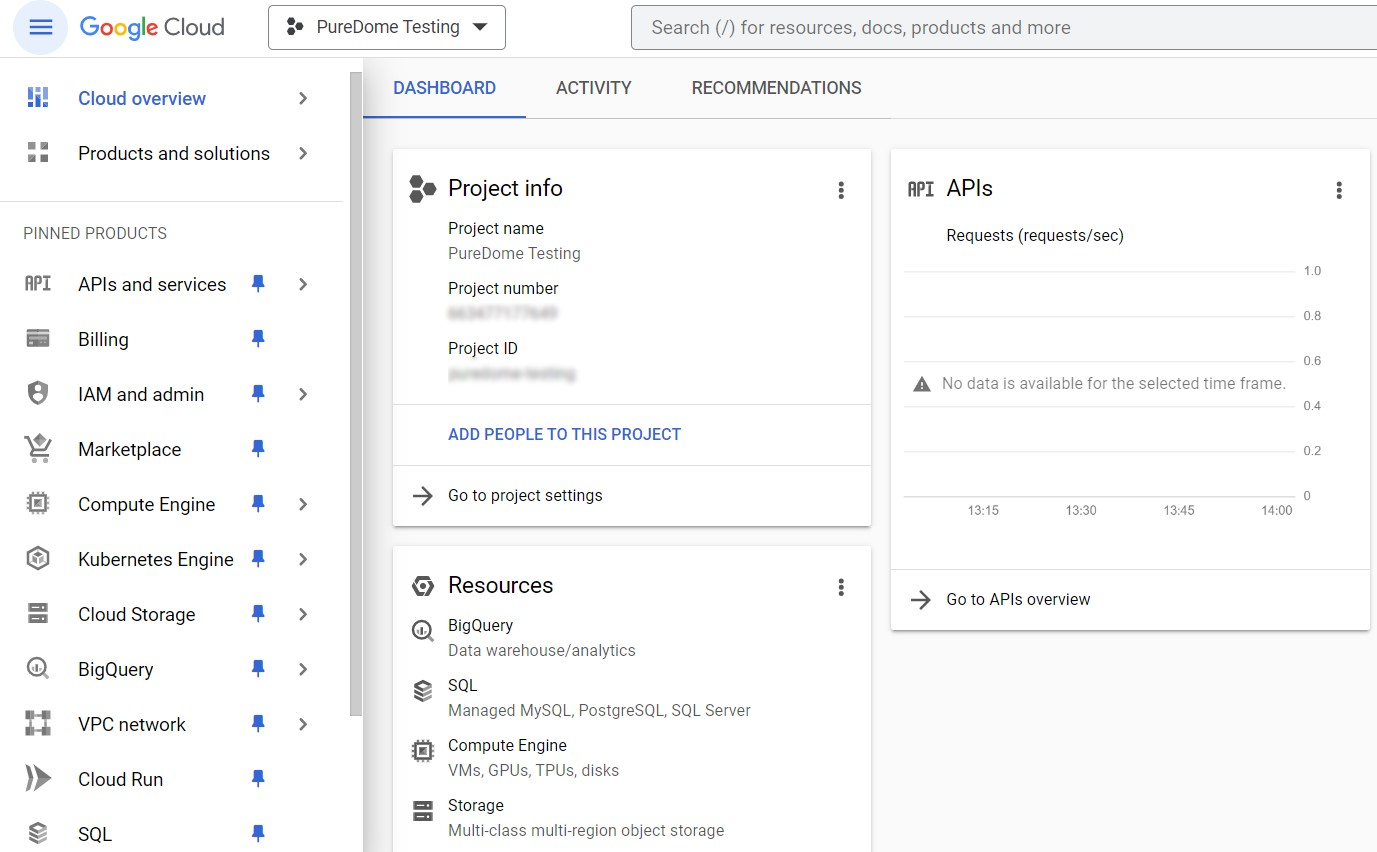
- After that, you will be directed to the main dashboard of your project.
- From the main dashboard of your project, go to APIs and services > Credentials.
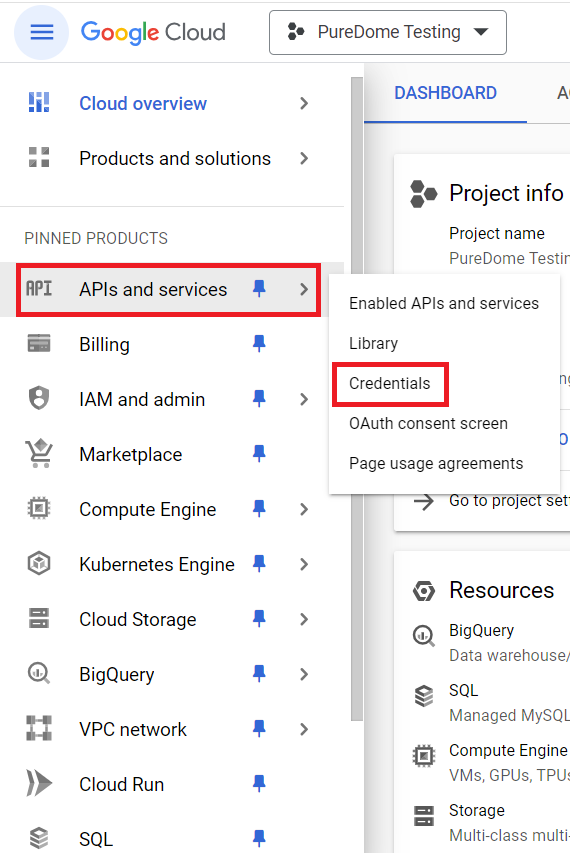
- Click Configure consent screen.

- You're now on the OAuth overview dashboard. Click the blue Get started button in the middle.

- You're now on the App Information step of the OAuth consent screen configuration. Enter a name that clearly identifies the app, and select the email users should contact for any OAuth-related queries.

- You're now on the Audience step of the OAuth consent screen setup. Select Internal.

- Enter a valid developer contact email so Google can reach you for alerts or app-related issues. Tick the checkbox to agree to the Google API services user data policy and click Create to complete the OAuth consent screen setup.

Step 2 - Configuring the Client ID and Client Secret
- On the OAuth overview screen, click the Create OAuth client button to begin setting up your OAuth 2.0 credentials for the app.

- On the Create OAuth client ID screen, select Web application as the Application type, and enter a name (e.g., PureDome OIDC Integration)

- Scroll down to the Authorised redirect URIs section, enter the following callback URL and then click the Create button to generate your OAuth client ID.
https://login.puredome.com/oauth2/callback
- Copy the Client ID and Client secret values for later use.
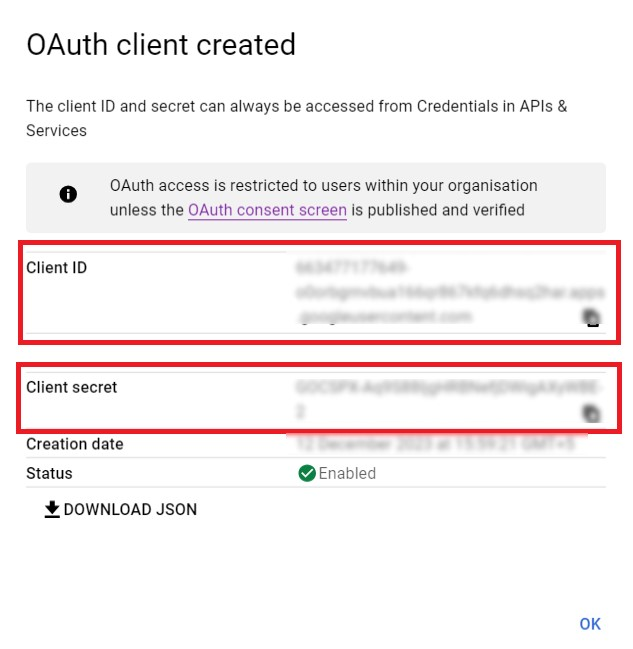
Step 3 - Configuring the Issuer URL
- Copy the following URL (to be used as issuer URL for later use):
https://accounts.google.com Step 4 - Managing user access
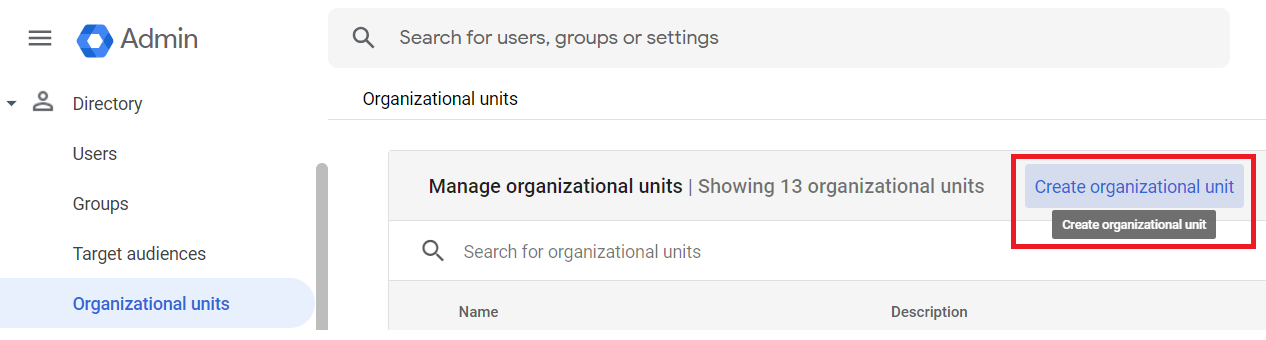
- From Google Admin console, go to Directory > Organizational units.

- Click Create organizational unit.
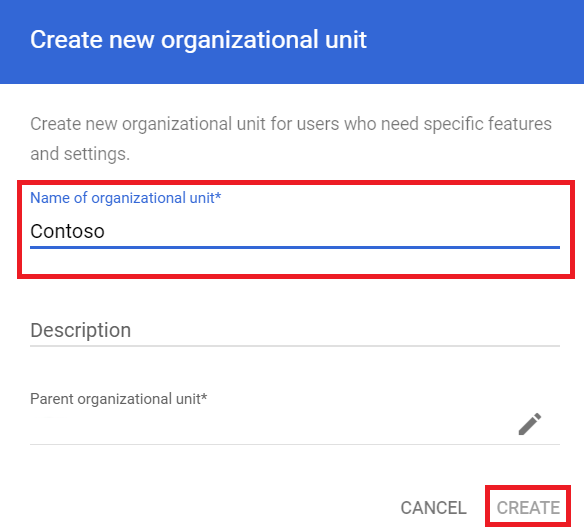
- Enter a Name of organizational unit and click CREATE.
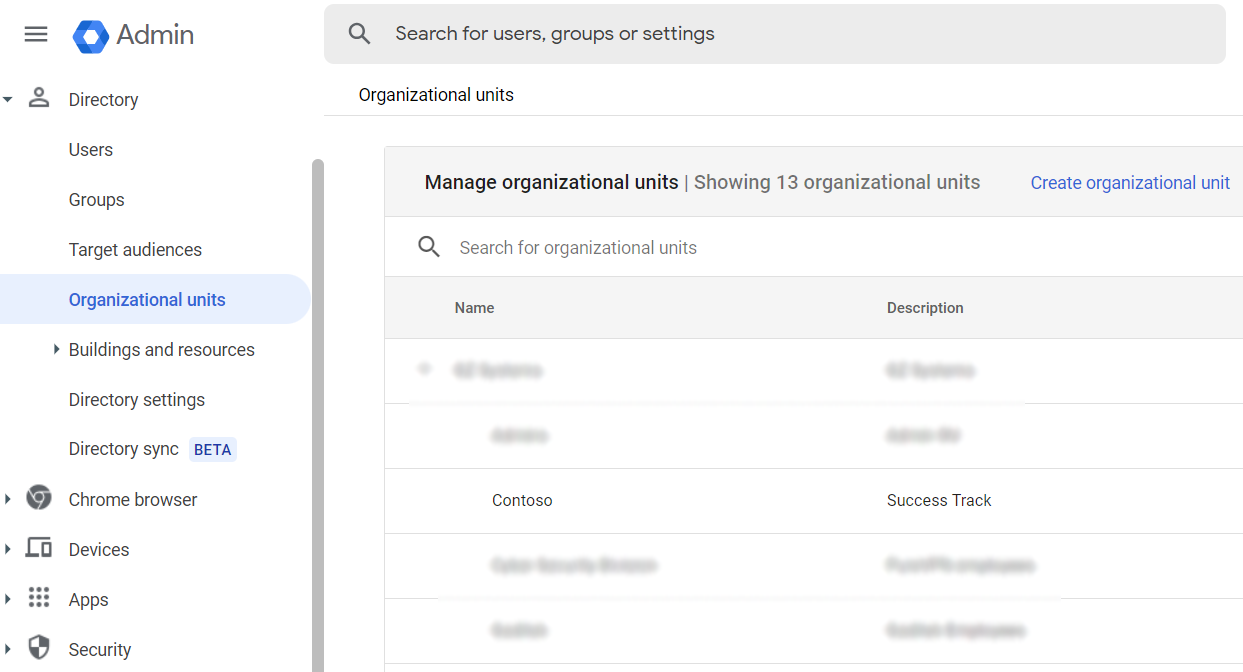
- The organization name just created will be visible under all Organizational units under your Google Admin workspace. Now, we need to assign internal users to this organizational unit.
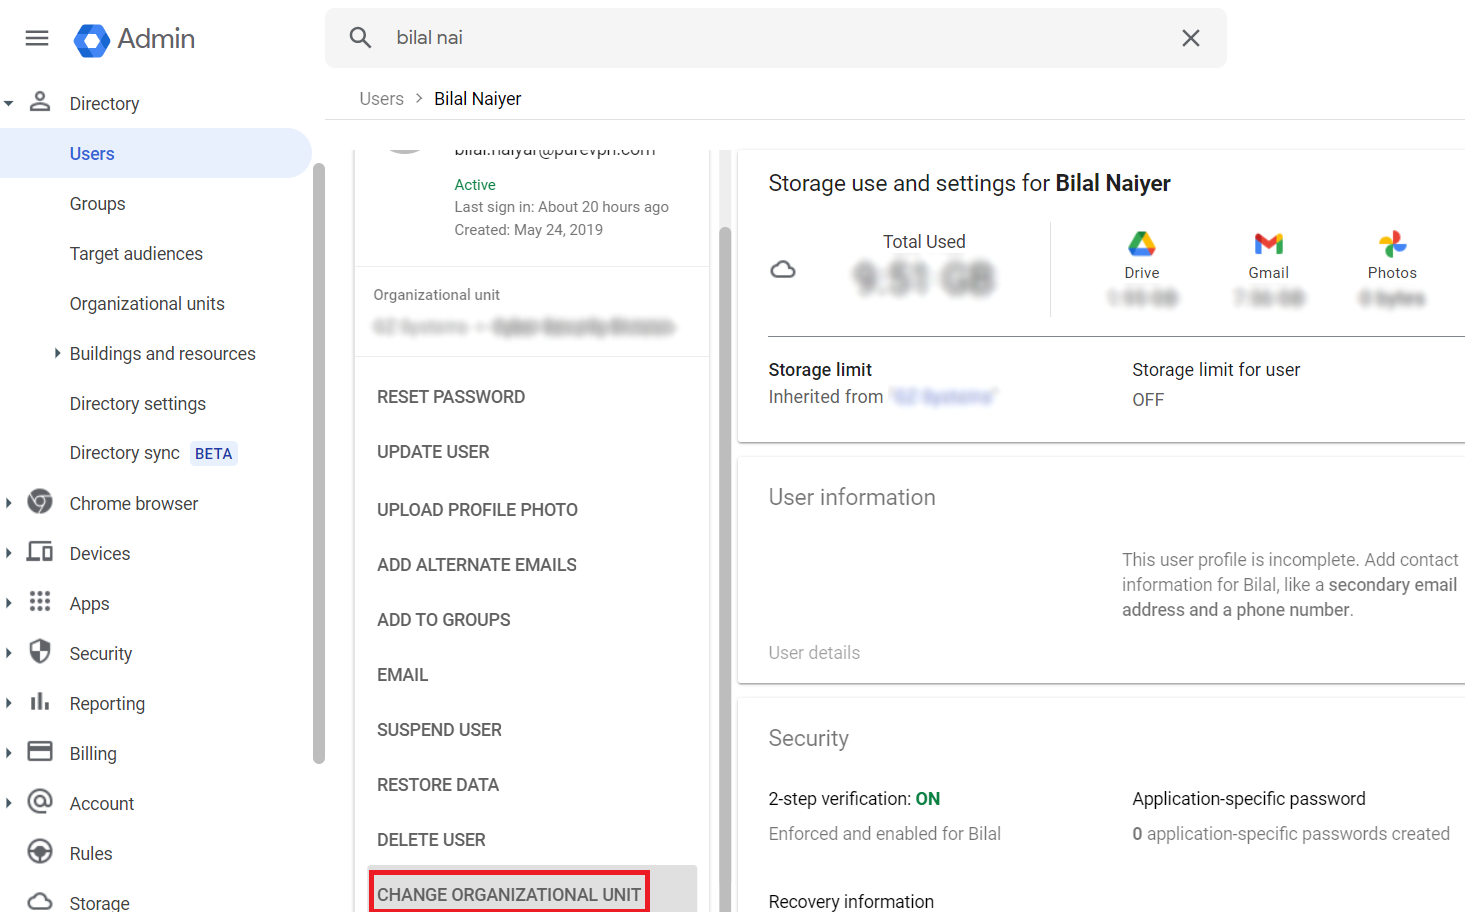
- Go to Directory > Users, and search the name of the user you intend to assign to your organizational unit.

- On the user's interface, click CHANGE ORGANIZATIONAL UNIT.
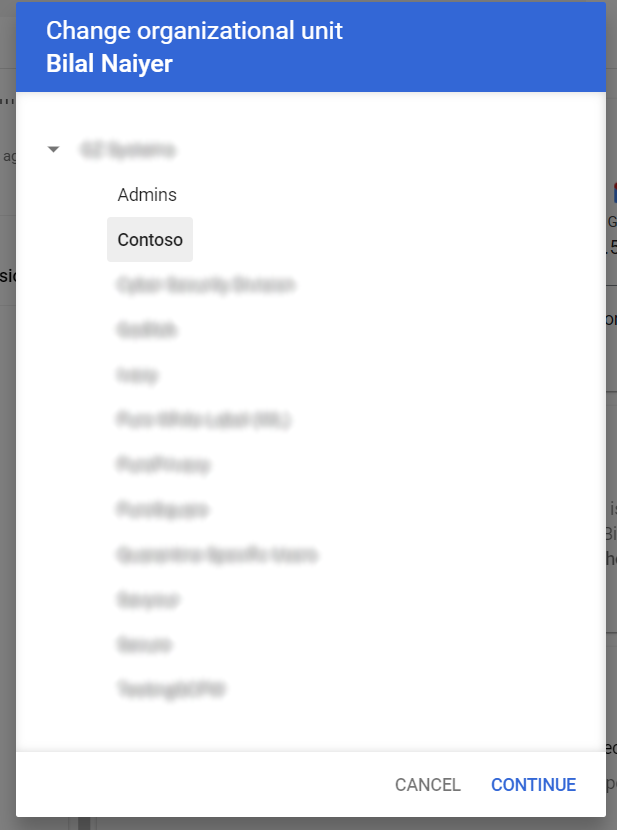
- Select the organizational unit we created in previous steps, and click CONTINUE.
Step 5 - Configure an OAuth app
- From Google Admin console, go to security > Access and data control > API controls > MANAGE APP ACCESS.

- Click Configure new app.
.png)
- Enter the client ID previously copied, and click SEARCH.
.png)
- The OAuth app associated with the entered client ID, which we generated earlier, should be visible. Click Include organizations.
.png)
- Search for the organizational unit to which we earlier assigned the team members and click SELECT.
.png)
- After selecting the organizational unit, click Continue.
.png)
- Select what type of access this app should have to Google data for users in the selected organizational unit, and click Continue.

- The integration of the app is now completed and ready for use with PureDome.
.png)
Step 6 - Adding a new identity provider
- Head over to the PureDome console on your browser, navigate to Integrations and Single Sign-On. By choosing Google you will be asked to enter four values as follows:
IDP Name: Any name you want
Client ID: Value copied from Google Admin dashboard
IDP Client Secret: Value copied from Google Admin dashboard
Issuer URL: Created in step 3.
- After completing all the steps above, you have successfully set up an OIDC application on your Google Admin workspace with SSO enabled for PureDome.
How to enable Google SCIM?
Unlike Microsoft Entra ID (Azure AD) or Okta, Google Workspace does not currently support direct SCIM provisioning for custom applications such as PureDome through a built-in SCIM configuration interface.
Google Workspace only supports automated SCIM provisioning for applications officially pre-integrated into the Google App Gallery (such as Slack, Zoom, Salesforce, and Atlassian products).
Since PureDome is configured as a custom SSO application, Google does not provide a native SCIM connector for direct provisioning.
How PureDome Supports Google SCIM
To support automated user and group synchronization with Google Workspace, PureDome uses a secure Google Directory API-based integration.
Instead of Google pushing users directly through a native SCIM connector, PureDome securely communicates with your Google Workspace directory using Google's Admin SDK APIs and delegated OAuth access.
This integration allows PureDome to:
- Sync users from Google Workspace
- Sync groups and group members
- Detect user status changes
- Automate onboarding workflows
- Support centralized identity management alongside Google SSO
Below are the steps to configure Google SCIM integration:
Step 1 - Enable Google Admin SDK API
- Log in to the Google Admin console, and go to API & Services > Library.

- From the Library section, open the Google Workspace Admin SDK API. (If it is not enabled, you will need to enable it first for your workspace)

- From the Admin SDK API page, click on Manage.

- From the Admin SDK API page, click on Credentials.

Step 2 - Create OAuth Credentials and Service Account
- On the credentials page, click Create credentials and then select OAuth client ID.

- On the Create OAuth client ID screen, select Web application as the Application type, and enter a name

- Copy Client ID and Client secret for later use.

- Once the OAuth application has been created, we need to create a service account. From the credentials screen, click Manage service accounts.

- From the service account screen, click Create service account.

- Enter a service account name and ID, then click Create and continue.

- Once the service account has been created, click on the newly created service account.

- From the service account screen, click Key, then click Add key, and select Create new key.

- You will be asked to select a key type. Select JSON.

- A JSON file will be downloaded to your computer. Save it for later use. Next, from the service account screen, open the Details tab, copy the Client ID, and save it for later use.

Step 3 - Configure Domain-Wide Delegation
- Next, go back to the Google Admin cloud console, and go to Security > Access and data control > API controls.

- From the API controls screen, click Manage Domain Wide Delegation.

- Click Add new, and a popup will open asking you to enter the Client ID and OAuth scopes.

- For the Client ID, enter the Client ID you copied from the service account screen. Under OAuth scopes, enter the following parameters one by one:
https://www.googleapis.com/auth/admin.directory.user
https://www.googleapis.com/auth/admin.directory.group
https://www.googleapis.com/auth/admin.directory.group.member
- The SCIM integration on Google Console has been completed. Next, please share the following details with the PureDome Customer Support team in one message:
- The JSON file you downloaded earlier
- The email ID associated with your Google Workspace account
- The SCIM Base URL (generated from PureDome console after enabling SCIM)
- The OAuth Bearer Token (also generated after enabling SCIM)
- To obtain the SCIM Base URL and OAuth Bearer Token, go to the PureDome console, enable SCIM, and copy the generated values. Then contact the support team, and they will guide you on the secure method to share these details. Once received, our team will complete the remaining steps for SCIM integration from our side.

Note:
- Single-Sign-On (SSO) will be enabled for the PureDome console and apps.
- Only users/groups assigned in your organization to this application will be able to log in subject to being invited to the PureDome console via their registered email address on their Google workspace account.
Note:
Supported app versions for SSO:
Windows: v2.1.6.8 and above
macOS: v2.1.3 and above
iOS: v2.1.2 and above
Android: v2.4.34 and above
If you have any questions or are experiencing any issues, please don't hesitate to contact our 24/7 customer support team via live chat or email at support@puredome.com. We're always happy to help!