
Experience the ultimate home-based cloud solution with PureVPN by easily setting up and connecting it to your Synology NAS. This straightforward guide will enable you to unleash a fast, secure, and reliable cloud experience.
Find your VPN credentials for manual configuration
To find your VPN credentials log into the PureVPN Member Area. Click 👉 here to visit Member Area.
- Login to the Member Area using your PureVPN registered email address and password.
- On subscriptions tab scroll down to be able to view your VPN credentials.

- You will be able to see and copy your VPN credentials.
- Note down your PureVPN username and click on Eye icon to make your password visible and use it in the manual configuration.

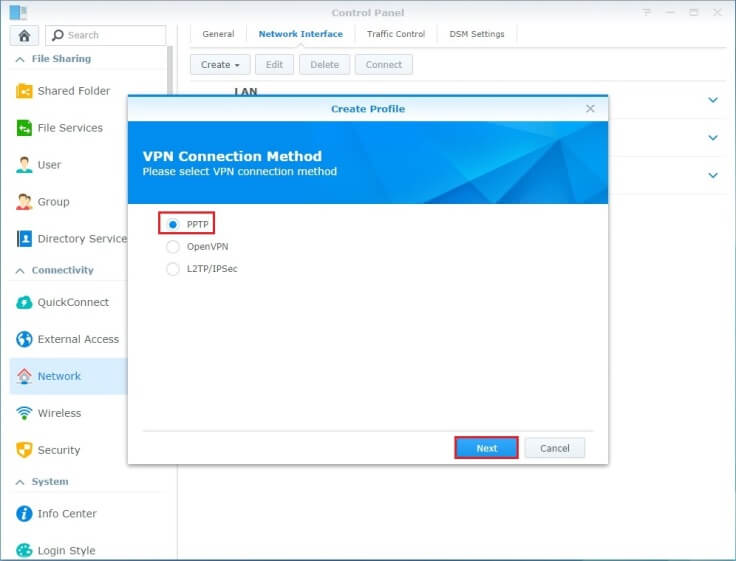
How to set up PPTP on Synology Router
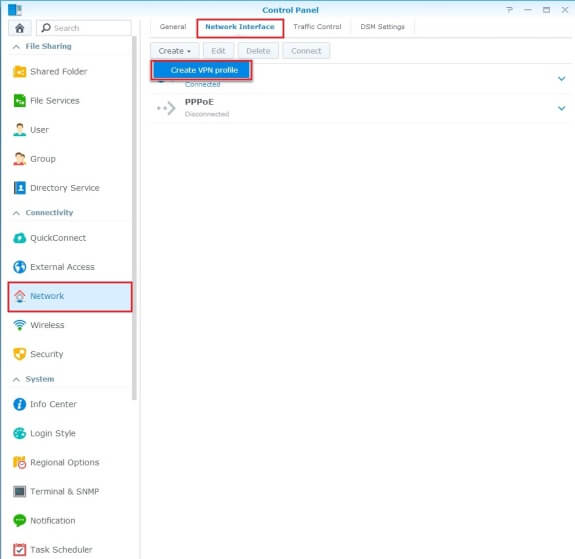
- To get started, access the Control Panel on your Synology device and navigate to the Network section in the left sidebar. From there, click on Network Interface in the top menu bar to initiate the creation of your VPN profile. Choose PPTP as the preferred VPN connection method and proceed by selecting Next.
- To create a VPN profile, you need to specify the general settings as explained below.
- Profile name: You can name your profile anything you like e.g. PureVPN US.
- Insert the desired server: Please refer to the server address from this link.
- Enter your PureVPN credentials. Here is how you can find your VPN credentials.
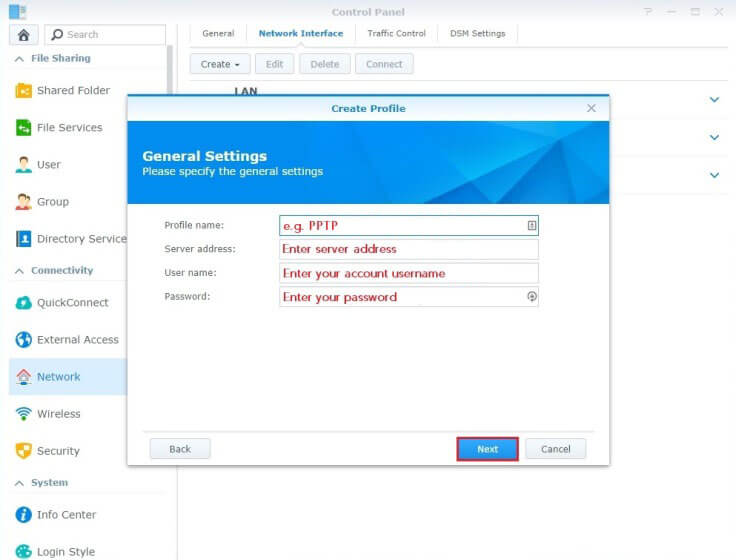
- When you're done, click Next.
- You will now be redirected to Advanced settings where you will fill them out as follows.
- Authentication: Choose MS CHAP v2 from the drop-down menu.
- Encryption: Choose Maximum MPPE (128 bit) from the drop-down menu.
- Make sure you tick the following options only.
- Use default gateway on remote network.
- Reconnect when the VPN connection is lost.
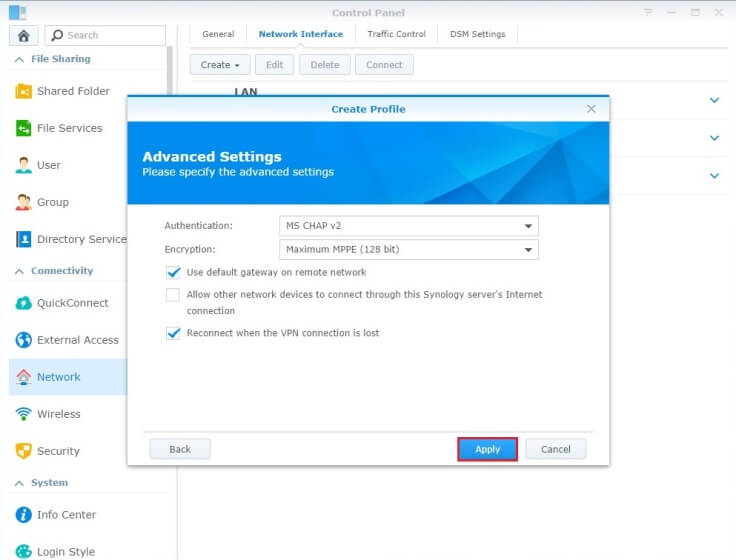
- When you're done, click Apply.
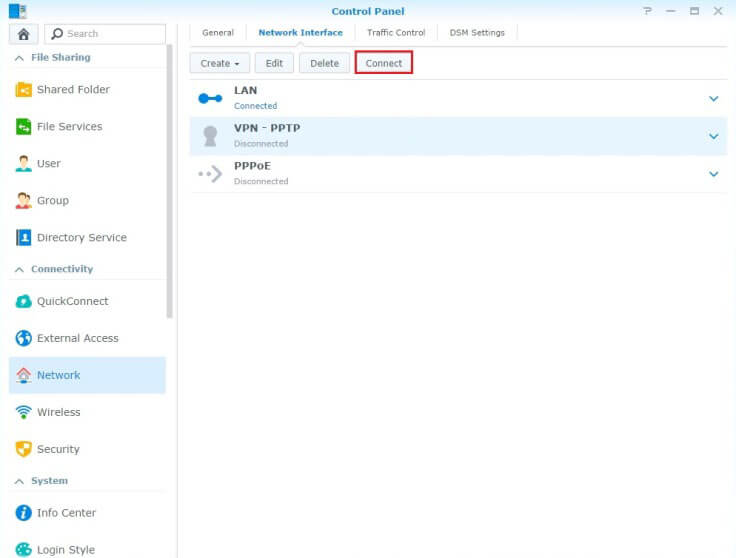
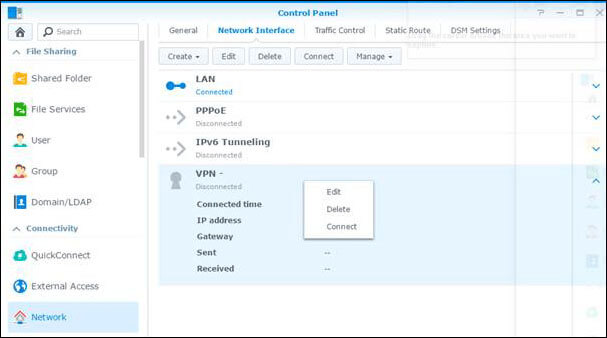
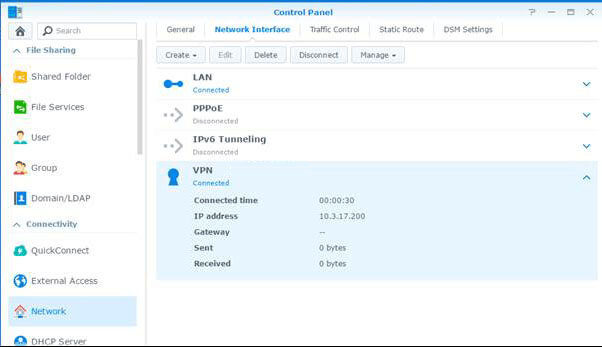
- Now you'll see that your VPN profile has been created - to establish a VPN connection, click Connect.
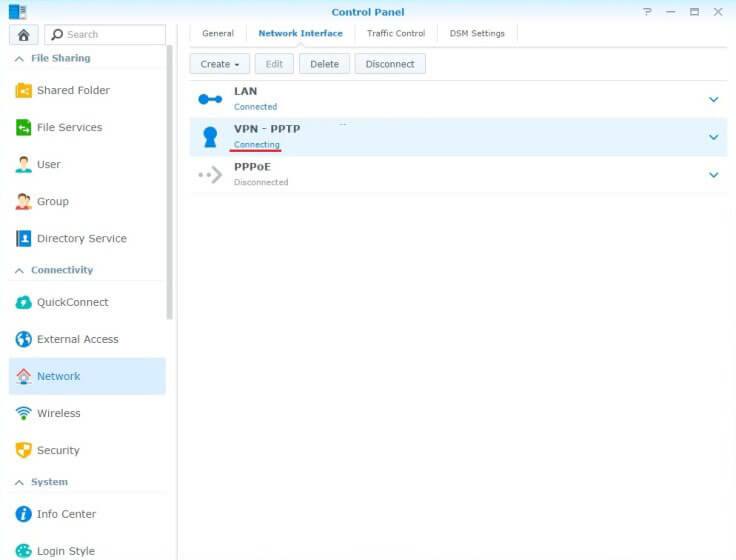
- The status of your profile will now change from Disconnected to Connecting.
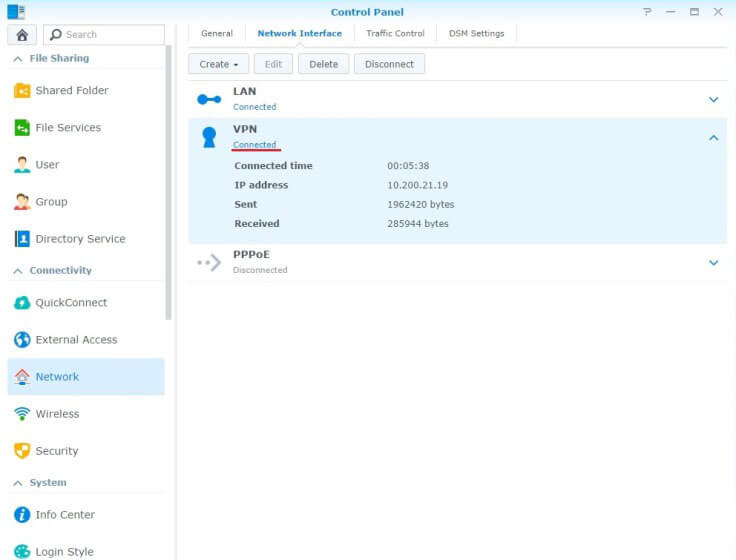
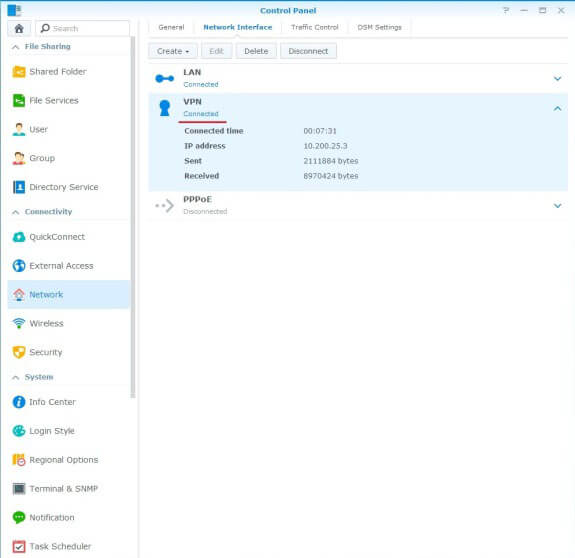
- Once you have established a connection, the status of your VPN profile will change to Connected and you will be able to see the duration of your connection, your new IP address as well as bytes sent and received.
- To disconnect, just click Disconnect button :)
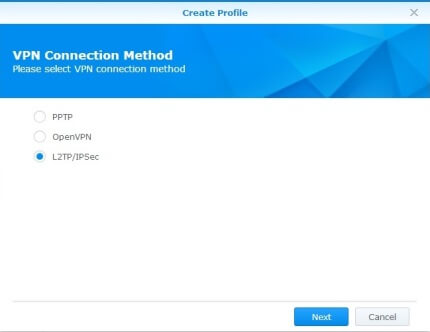
How to set up L2TP/ IPSec on Synology Router
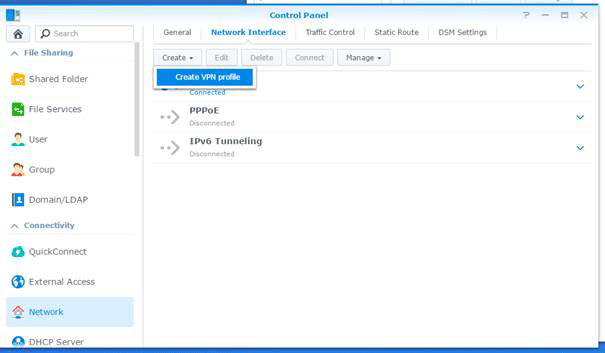
- In your Synology's Control Panel, click Network and then the Network Interface tab. Below, click Create > Create VPN profile.
- In the new window, select L2TP/ IPSec.
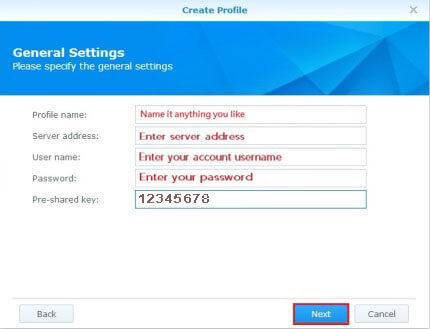
- Now fill in the general settings of your VPN profile as follows:
- Profile name: You can name this anything you like, e.g. the country/name of the server you're connecting to.
- Insert the desired server: Please refer to the server address from this link.
- Username and Password: Enter your VPN credentials. Here is how you can find your VPN credentials.
- Pre-shared key: Here, please type 12345678
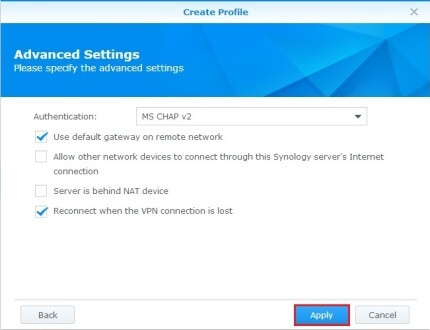
- The advanced settings of your VPN profile should be set as follows.
- Authentication: Choose MS CHAP v2 from the drop-down menu.
- Please check (tick) the Use default gateway on remote network and Reconnect when the VPN connection is lost options.
- Now that you've created your VPN profile, you can click Connect whenever you wish.
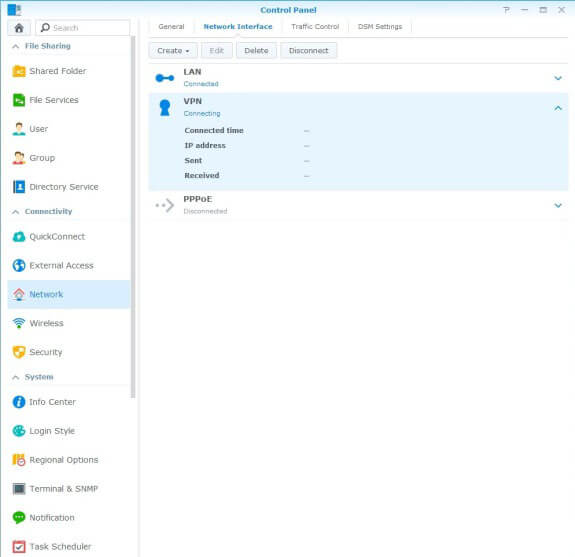
- The status of your profile will now change to Connecting. Please note that this usually takes under a minute, but might take just a bit longer...
- After waiting for your connection status to change to Connected, you can refresh your page if you wish.
How to set up OpenVPN on Synology Router
- Log into your administration console usually Open Control Panel.
- Click the Network Interface tab.
- Click Create > Create VPN profile.
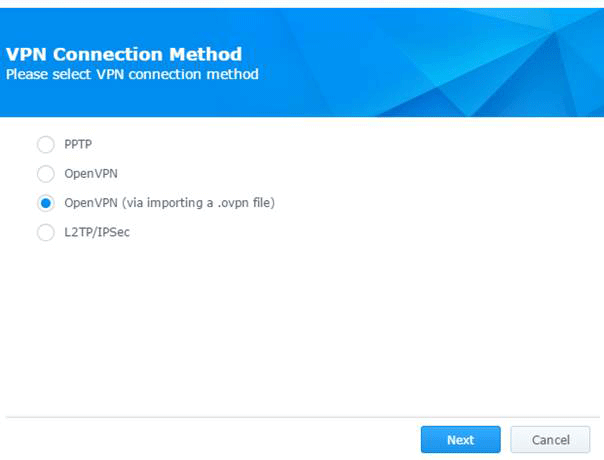
- Select OpenVPN (via importing a .ovpn file) and click Next.
- You can find the list of all available locations here for OpenVPN.
- Click Linux link, download and extract the zip file.
- Enter the Profile name (a name which you'll see in the Network Interfaces list), your PureVPN Credentials. Click the Browse button next to Import .ovpn file: and find the file we got from the previous step. Add the ca.crt file in CA Certificate provided with the ovpn file. Press Next.

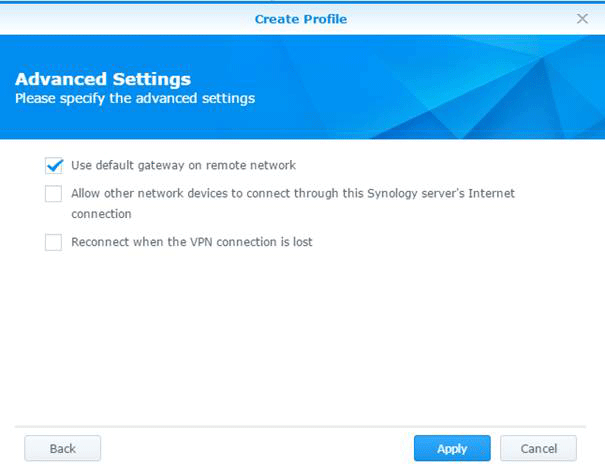
- Enable Use default gateway on remote network ***
If you want, enable Reconnect when the VPN connection is lost
Press Apply.
- On the Network Interfaces menu, right-click your freshly made VPN connection and press Connect, or press Connect button.
- If the connection was successful, status below the name of connection will say Connected.
Connecting to your Synology from the Outside (WAN)
In case you check the Use default gateway on remote network you might have problems connecting to your NAS over the Internet.
If you want security, you need to have this checked.
If you want to access your NAS over the internet, you have to leave this unchecked, but the connection may fail.
The reason for it is that the default gateway redirects all requests that are not within the private network over the VPN connection. You would need to connect to the VPN gateway's (external) IP, but since it is a shared IP address among everyone connected to it, it just drops the incoming connection, as the server doesn't know to whom to relay the package
Delete