Introducing PureSquare – for security beyond VPNs

Visit our website

Don’t worry about forgetting your passwords ever again with the all-new password manager. Try PureKeep

SMTP – Sending E-Mails While on PureVPN

Oct 28, 2015
Nov 29, 2021
0 Comments
Download PDF

Unable to send emails while connected to PureVPN? It’s advised that you switch to secure ports like 587 or 465. Here’s a step-by-step guide on how to configure your email settings on Windows and Mac:
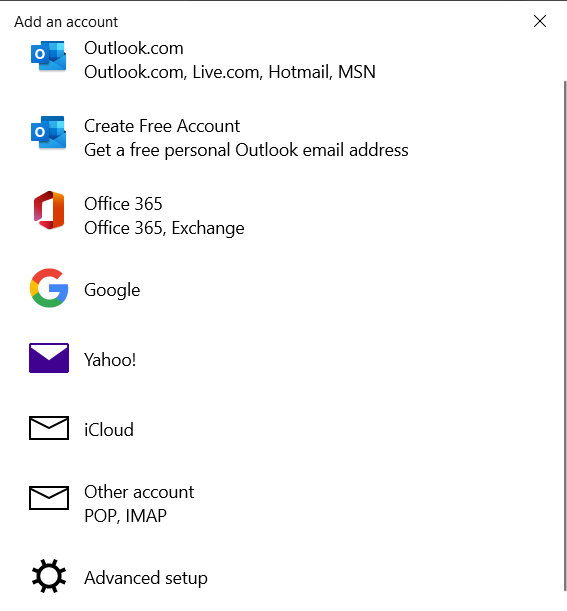
  • Open email client and click on ‘Add Account’
  • Scroll down below and click on Advanced setup.

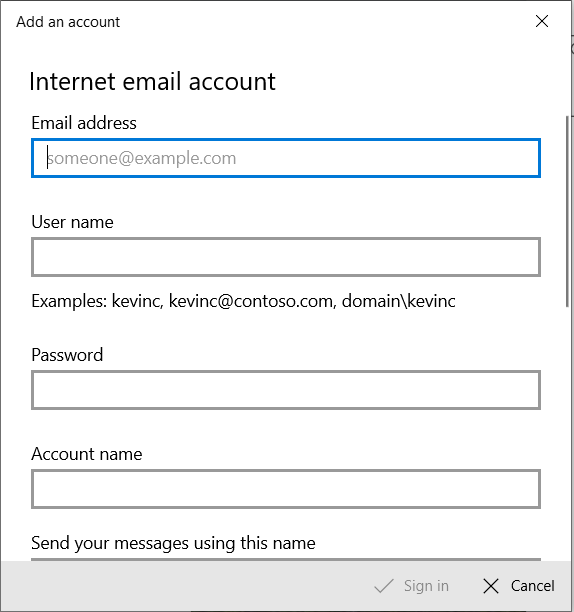
Fill out the following details.

  • Email address: Your email address
  • Username: Your username
  • Password: Your email password
  • Account Name: Account name you want to use
  • Internet email account type: gmail/outlook any other
  • In SMTP port type 465, 587 port. Make sure to keep the SSL encryption enabled.
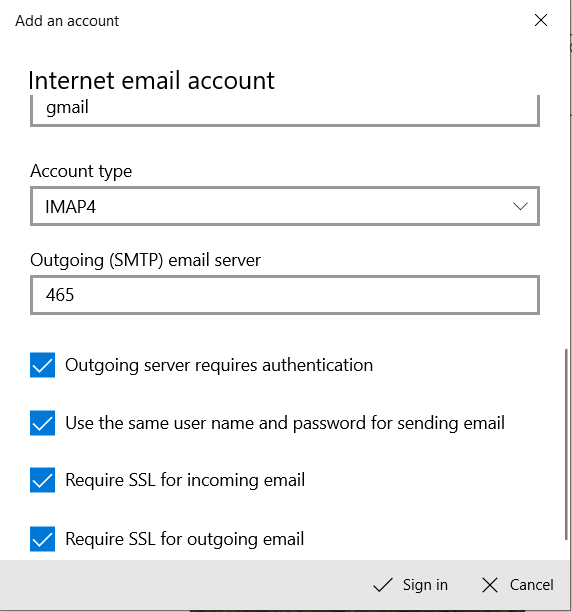
  • Please be sure that ‘My outgoing server (SMTP) requires authentication’ in the ‘Outgoing server’ tab is checked because most e-mail services require this.

 How to Change Your SMTP Settings in Thunderbird

Here is how to change your SMTP settings for Thunderbird:

Go to the menu, click ‘tools’ and then ‘account settings’,

Now click ‘outgoing server (SMTP)’

Choose the outgoing server from the list you need to modify and then click ‘edit’

Now a window will appear where you can modify Server name, Port and Connection Security. Both the settings must be changed depending on what your e-mail service supports. You can try different combinations.

1

 Mail Server Settings for Mac

You need to refer to your e-mail app’s documentation for info on how to use these settings.

  • Choose ‘Preferences…’ from the menu
  • Choose ‘Accounts’ in the toolbar
  • Click on the account you wish to verify
  • Verify the account as well as the incoming Mail Server settings on the right
smtp_mac.png
  • Select ‘Edit Server List’ from the Outgoing Mail Server pop-up menu.
smtp_mac2.png
  • Verify the Server Name setting on the right. If the Server Name is not correct, click on the Server Name box under Account Information and enter the correct server name.
  • 7 Click ‘Advanced’.
smtp_mac3.png
  • Verify the Advanced settings on the right.
  • Click ‘OK’.

How helpful did you find this answer?

Comments (0 )