How to set up PureVPN on Mikrotik router

MikroTik routers provide an ingenious solution to internet users at home, allowing them to set up several small access-points instead of one big one. You can learn how to setup PureVPN on Mikrotik Router from here.

Written By Lorenzo Vincent

Updated at September 28th, 2023

Configuring a PureVPN tunnel on your router is a great way to ensure the safety and security of all the devices in your home. This method is especially beneficial if you have devices that don’t have VPN compatibility or you want to protect all the Wi-Fi-connected devices in your home.

MikroTik routers provide an ingenious solution to internet users at home, allowing them to set up several small access-points instead of one big one. Because Internet security is a problem with any Wi-Fi device out there, a VPN is always recommended. You can learn how to set up PureVPN on Mikrotik Router from here.

Find your VPN credentials for manual configuration

To find your VPN credentials log into the PureVPN Member Area. Click 👉 here to visit Member Area.

  • Login to the Member Area using your PureVPN registered email address and password.

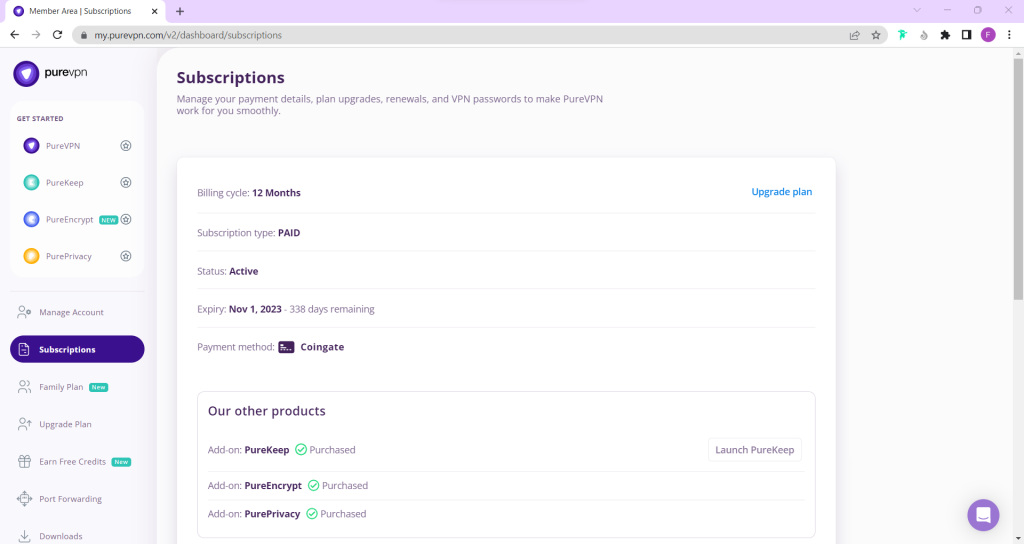
  • On Subscription tab scroll down to be able to view your VPN credentials.

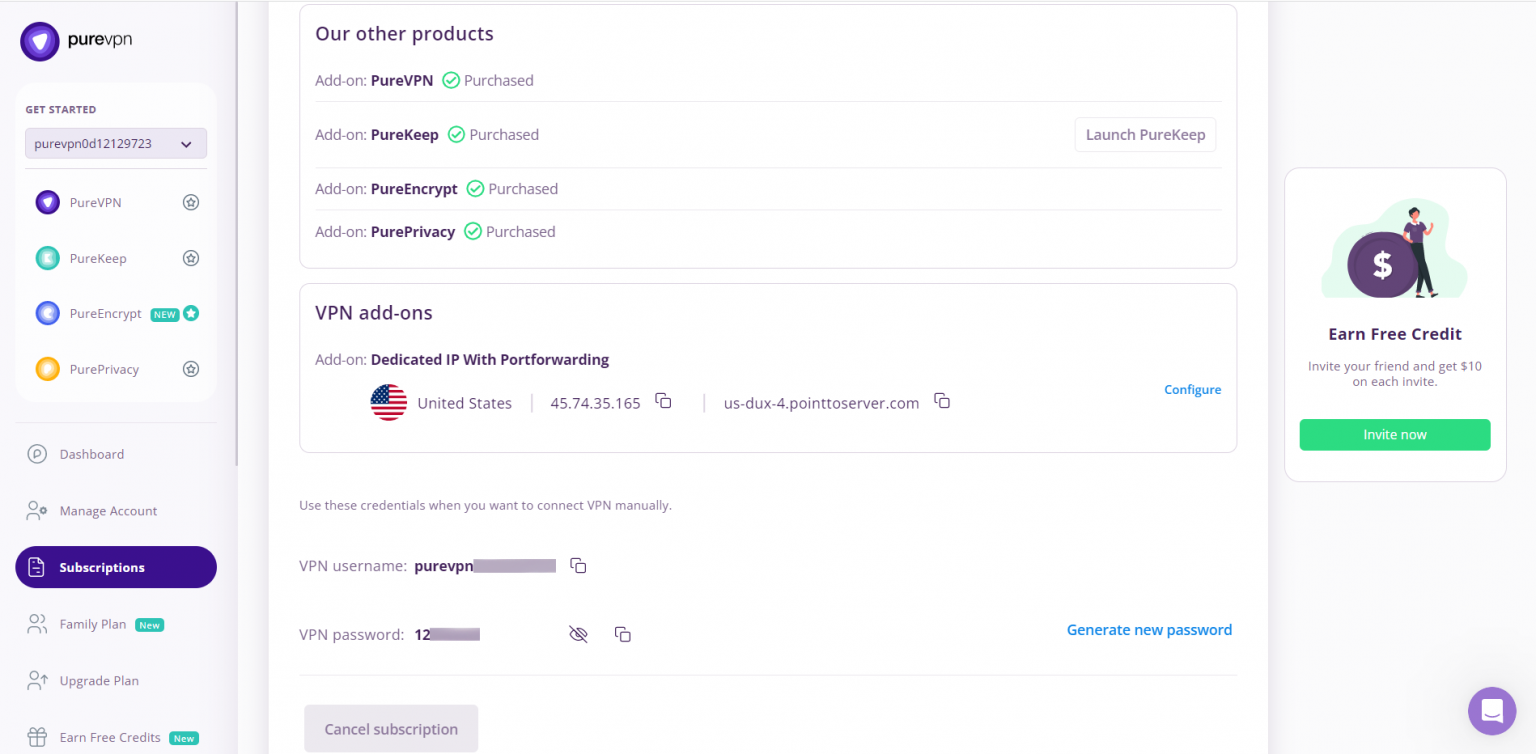
  • You will be able to see and copy your VPN credentials.
  • Note down your PureVPN username and click the Eye icon to make your password visible and use it in the manual configuration.

Delete

How to set up IKEv2 on Mikrotik router

This guide offers a comprehensive step-by-step tutorial for setting up an IKEv2 connection on Mikrotik using PureVPN settings. Follow our instructions to complete your Mikrotik VPN client setup and ensure that your online experience is private, secure, and free from restrictions when using our service.

  1. Click here to download the certificate.
  2. Proceed to your Mikrotik configuration panel.
  3. Open Files and add the certificate you’ve downloaded.

  • Import your certificate via System > Certificates > Import. In the drop down menu opposite the Only File field choose the certificate you’ve just added, and click Import.

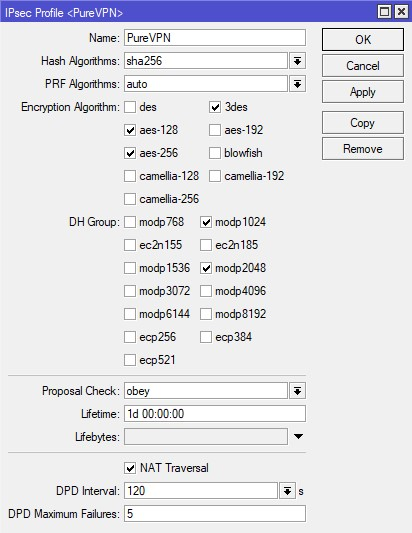
  • Add a new profile on your Mikrotik router by navigating to IP > IPsec > Profiles > Add New. Fill out the fields of your new profile in the following way: 
    1. Name: Enter a custom name of your new VPN profile
    2. Hash Algorithms: sha256
    3. Encryption Algorithm: aes-128/ aes-256
    4. DH Group: modp1024/ modp2048
    5. Proposal Check: obey 
    6. Lifetime: Leave the default 1d 00:00:00
    7. DPD Interval: 120 
    8. DPD Maximum Failures: 
  • Click Apply > OK.

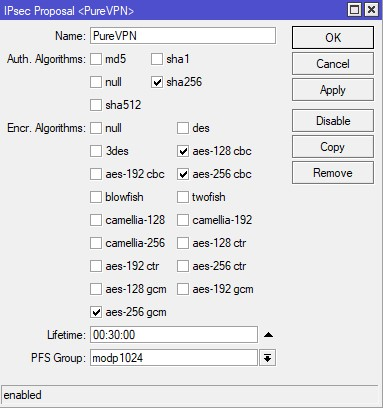
  • On the same IPsec screen, go to the Proposals tab and click Add New. Complete the fields as shown below: 
    1. Enabled/Disabled: The button should be enabled. 
    2. Name: Enter a custom name, for example PureVPN
    3. Auth. Algorithms: sha256
    4. Enc. Algorithms: aes-128-cbc/ aes-256-cbc/aes-256 gcm
    5. PFS Group: modp1024
  • Click Apply > OK.

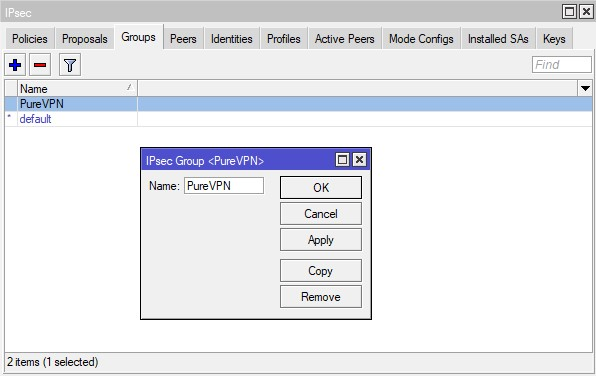
  • Navigate to the Groups tab, press Add New, and enter name of the new group, for example PureVPN, and click OK.

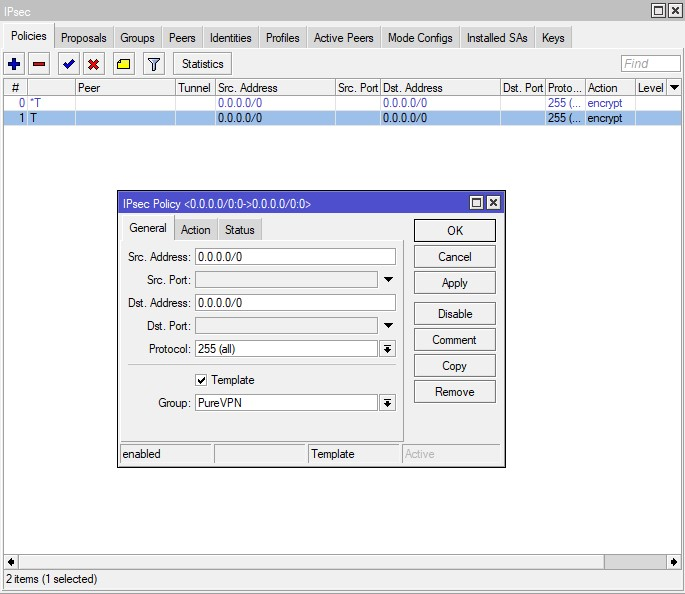
  • Now you need to create an IPsec policy on your Mikrotik router. Go to the Policies tab and click Add New. Fill out the fields as shown below and click OK: 
  1. Enabled: The box should be checked 
  2. Src. Address: Leave the default 0.0.0.0/0
  3. Dst. Address: Leave the default 0.0.0.0/0
  4. Protocol: 255 (all)
  5. Template: Check the box
  6. Group: default (make sure it's the one you created in Step 6, in our case it is PureVPN)
  7. Action: encrypt

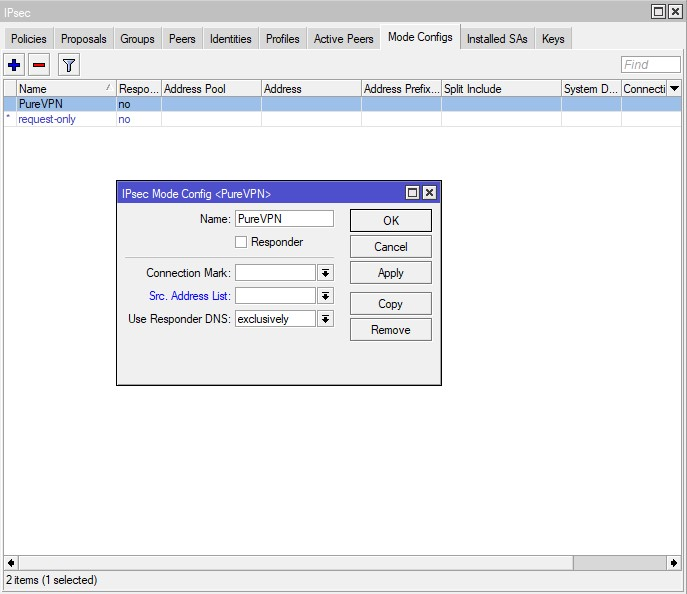
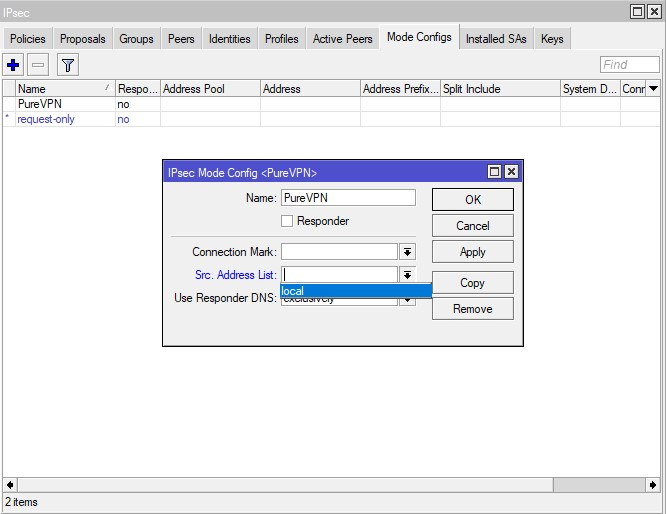
  • Proceed to the Mode Configs tab in the same IPsec section and press Add New. Enter the name of the configuration and uncheck the responder select Use Responder DNS: exclusively then click Apply > OK.

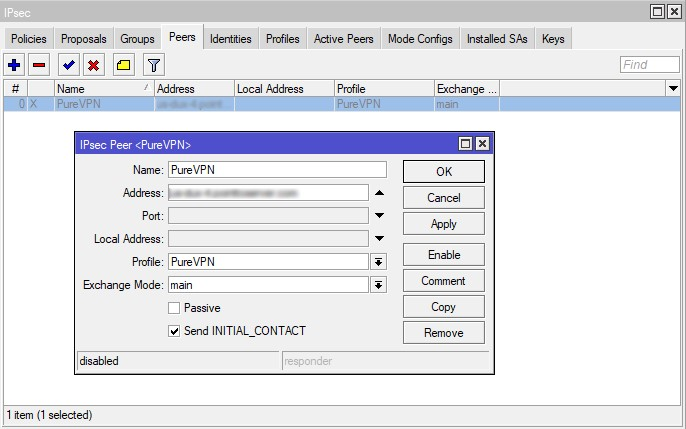
  • Create an IPsec peer on the IPsec > Peers tab. Click Add New and provide the following details and click Apply > OK.
    1. Enabled: The box should be checked
    2. Address: Enter the IP address of the chosen VPN server (you can find it in the IPS field of the settings you’ve downloaded)
    3. Profile: Select the created profile, in our case it is PureVPN
    4. Exchange Mode: main
    5. Send INITIAL_CONTACT: The box should be checked. 

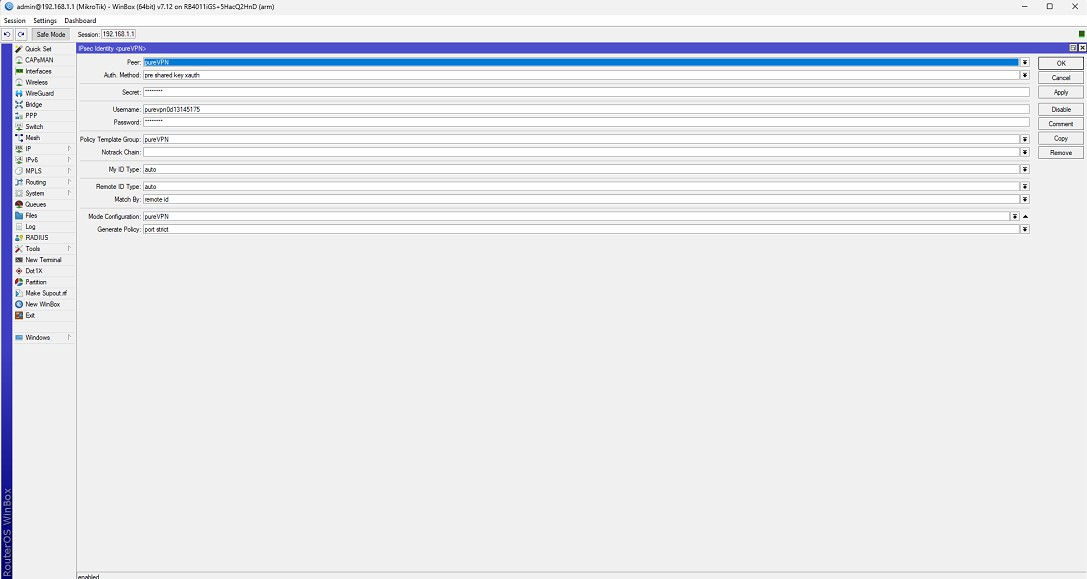
  • On the IPsec > Identities tab, click Add New and fill out the fields as shown below: 
  1. Enabled: The box should be checked
  2. Peer: Select the peer you’ve added, e.g. PureVPN
  3. Auth. Method: pre shared key xauth
  4. Secret Key: 12345678
    Enter your PureVPN credentials. Here is how you can find your VPN credentials.
  5. Policy Template Group: Select the policy you’ve created, in our example it is PureVPN
  6. My ID Type: auto
  7. Remote ID Type: user fqdn
  8. Remote ID: pointtoserver.com
  9. Match By: remote id
  10. Mode Configuration: Choose the name of the configuration you’ve added in step 8
  11. Generate Policy: port strict
  • Click Apply > OK.

  • To send all traffic to the tunnel, you need to create an address list with your local network. For this, navigate to Firewall > Address Lists and click Add New. In the Name field, choose your local network and type in its IP address and network prefix length in the Address field.

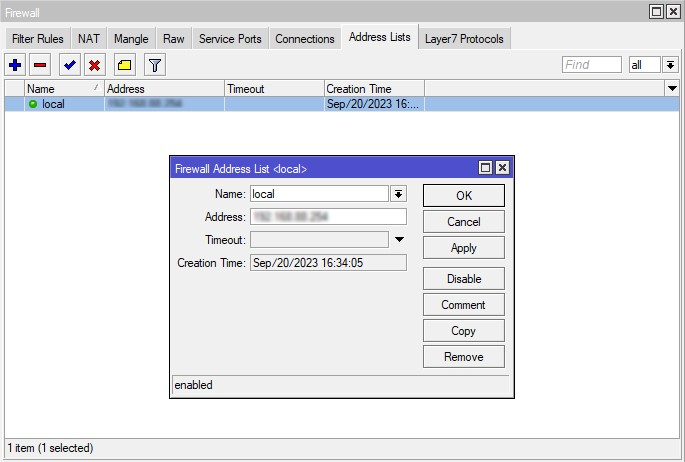
  • Now you need to assign this list to your mode configuration. For this, go to IPsec > Mode Configs > PureVPN, and select the list you’ve just created in the drop down menu in front of Src. Address List field.

Delete

Note: Don't forget to disable the FastTrack rule in Firewall > Filter Rules list.

  • You can check the established connections on Active Peers tab of IPsec section.  

That's about it. Enjoy total unlimited internet freedom with PureVPN!

Delete

How to set up PPTP on Mikrotik router

  • Login to your router. Click PPP and select PPTP client.

  • Enter PureVPN-PPTP in the Name section.

  • Click Dial Out and enter the server address you want to connect with. (Please refer to the server address shared below). 
    1. Germany: de1.pointtoserver.com
    2. Netherlands: nl1.pointtoserver.com
    3. United Kingdom: ukl1.pointtoserver.com
    4. United States: usil1.pointtoserver.com
    5. United States: ustx1.pointtoserver.com
    6. United States: usca1.pointtoserver.com
    7. United States: usfl1.pointtoserver.com
    8. United States: usny1.pointtoserver.com
    9. United States: uswdc1.pointtoserver.com
    10. Australia: au-sd1.pointtoserver.com
  • Now, enter your PureVPN credentials. Here is how you can find your VPN credentials.
  • Fields respectively. Check-mark the dial on demand and add default route options. Click Apply/ OK to save your settings.
Delete

Note: If you face any problem in connecting VPN then uncheck Add Default Route.


  • Now click IP from the main menu and select Firewall.

  • Now choose the NAT tab and add a new NAT rule. choose scrnat from chain and PureVPN-PPTP from the Out Interface List.

  • Now, click the Action tab and select masquerade from the drop-down list. Click Apply/OK to save the settings.

  • Now select the Mangle tab and add a new rule. In general, tab, choose prerouting from the chain list. Then enter the IP address you wish to connect with or the range of the IP addresses you want to route through the VPN tunnel in the Src Address field.

  • Now choose the Action tab and choose mark routing from the Action list. Type PureVPN-PPTP in the New Routing Mark field and save the settings.

  • Click IP from the main menu and choose Routes.

  • Now click the + icon to add a new route. Enter 0.0.0.0/0 in the Dst. Address, choose PureVPN-PPTP from Gateway and then choose PureVPN-PPTP from the Routing Mark. Click Apply/OK to save your settings.

  • Now click IP from the main menu and select DNS.

  • Check-mark Allow Remote Requests and save the settings.

  • Click IP from the main menu and select DHCP Server.

  • Now enter 208.67.222.222, 208.67.220.220 in DNS Servers fields. Click Apply/ OK to save your settings.

  • Now click Interfaces from the main menu, open the PureVPN-PPTP interface, and enable the connection from the status tab.

That's about it. Enjoy total unlimited internet freedom with PureVPN!

Delete

How to set up SSTP on Mikrotik router

  • Log in to your router. Click PPP from the main menu and select the SSTP client.

  • Enter your PureVPN-SSTP in the Name field.

  • Now click Dial Out, and enter the server address you want to connect with. (Insert the desired server: Please refer to the server address shared in the above note) Enter your PureVPN credentials. Here is how you can find your VPN credentials. Check-mark the dial on demand and add default route boxes. Click Apply/ OK to save your settings.

  • Now click IP from the main menu and select Firewall.

  • Choose NAT and add a new NAT rule. Choose scrnat from the chain list and PureVPN-SSTP from the Out Interface list.

  • Now choose the Action tab and choose masquerade from the Action drop-down menu.

  • Click Apply/ OK to save your settings.
  • Now select the Mangle tab and add a new rule.
  • In the General tab, select Prerouting from the Chain list. In Src Address, enter your IP address or the range of the IP addresses you want to route through the VPN tunnel.

  • Choose the Action tab. Now choose mark routing from the Action list. Type PureVPN-SSTP in New Routing Mark. Click Apply/ OK to save your settings.

  • Click IP from the main menu and select Routes.

  • Click the + icon to add a new route.
  • Enter 0.0.0.0/0 in the Dst. Address field. choose PureVPN-SSTP from Gateway, and then choose PureVPN-SSTP from the Routing Mark.

  • Click Apply/ OK to save your settings.
  • Click IP from the main menu and choose the DNS.

  • Check-mark Allow Remote Requests and save your settings.

  • Click IP and select DHCP Server.

  • Enter 208.67.222.222, 208.67.220.220 in DNS Servers fields and save your settings.

  • Now click Interfaces from the main menu and open the PureVPN-SSTP interface. Then enable your connection.

That's about it. Enjoy total unlimited internet freedom with PureVPN!

Delete